Tuesday, August 26, 2008
"Summer Picnic"
Thursday, September 4, 2008
7:00 pm
@ Kimberly’s House
8902 Drayton Heights
San Antonio, TX 78254
Cost: $30
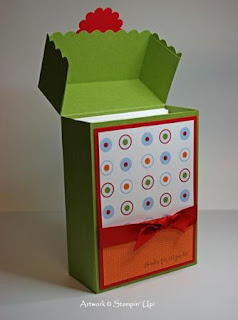
With this adorable class that screams “Party” and “Fun”, you will receive a pack of the Summer Picnic Designer Series Paper, a roll of the red striped grosgrain ribbon, and all of the other supplies needed to make these projects. There is a gift bag with matching tag, a CD case, a chocolate holder, and a super cute container. You will have paper and ribbon left to take home to recreate these projects.
Please RSVP by Thursday, August 28, @ 10:00 pm so that I can order your supplies and have them here for the class!
Feel free to share this invite with friends!!
Prizes for those who bring NEW friends!!
RSVP to Robin at rclarksudemo@sbcglobal.net or 912-3778
Visit my Stampin' Up! website, Events calendar, to see my other upcoming classes!
Thursday, June 12, 2008
Fresh Cuts Note Tote & Cards eScape Class!
Don’t you just love summer? It seems like the time of year when we tend to kick back and relax, and get together more often with friends and family. Now you can freshen up your summer-gift giving with this adorable set of 4 thank you cards in a custom-designed 5” x 5” note tote. Make a bunch of them, and you’ll never be caught without a cute hostess gift to give, or a thank you card to send. In this class you will make 1 note tote & 4 fresh cuts note cards.
Date: Wednesday, June 25th
Time: 7:00 - 10:00 pm
Cost: $21
Location: 8902 Drayton Heights
Please email me to purchase the stamp set & note cards to be waiting for you at the class: rclarksudemo@sbcglobal.net
Optional Supply List: If you have these things, feel free to bring them to help you complete your projects a little quicker, but the supplies are not mandatory!
Inks: Whisper White Craft Ink Pad; Blue Bayou, Soft Sky, Blush Blossom, and Groovy Guava Classic inks
Adhesive: Snail adhesive, or adhesive of your choice.
Accessories: Paper trimmer with scoring blade, paper snips, paper piercer with foam mat, Crop-a-Dile (or 1/8” handheld circle punch), Stamp-a-ma-jig
Shower Invitations
I know it's strange that I can go for weeks, or even a couple of months and not post at all, and now here I am posting twice in one day, but I'm on a roll! I've been stamping a lot, just haven't had time to post! Plus, my computer is so slow these days. I have it too full, I know, and I need to clean off the hard drive to speed it up. One of these days...
Anyway, my oldest daughter is getting married next month, and I made some shower invitations for the family shower that we are having tomorrow night. I thought I'd share what I made. This card uses Stampin' Up! stamp set To Have and To Hold from the Spring & Summer Collection. I used Cool Caribbean (my favorite color from last year's In Colors) because it is an almost-perfect match with the color of her bridesmaids' dresses. I did use a few things that are not Stampin' Up! -- I hate to admit it! But they were perfect for this project. I used a Cuttlebug embossing folder, Swiss Dot, on the large white layer, and I did use some square Nestability dies. Then I also used some little bitty pearls on the bouquet and one in the bride's hair. The story on that is that I had ordered some sticky-backed pearls thinking they would be large enough to use on the black tin flower pots that we will be using as table centerpieces for the reception. Well, it's the story of my life that I didn't pay attention to the size of the pearls and ordered about a thousand of them (slight exaggeration), and when they got here had a great laugh at myself because they were so tiny. So I had to use them somewhere! It was a big of a pain, but I only made 15 invitations, so it was okay.
Hope you enjoy my card, and my story!
Robin
Cute Chipboard Frame
I made this cute little frame as one of the projects a couple of weeks ago for a chipboard class that I taught. I used the outside piece after I punched out the flower, covered it with Afternoon Tea designer paper, then embellished it with a couple of other pieces of chipboard covered in coordinating paper from that same Afternoon Tea collection. I then used some hardware from the Silver Hodgepodge Hardware, a piece of Groovy Guava double-stitched grosgrain ribbon, and a flower and half-pearl from the Pretties kit. The funny thing is, I didn't know what picture I was going to use in the frame, but after I chose the picture of my granddaughter and slid it in, the bow on her hat slid right underneath the flower that I had previously put onto the frame! It was so perfect, I couldn't have planned it any better!
Oh, I used Sticky Strip to attach a piece of cardstock on 3 sides to the square of chipboard so that my frame had a back, and then I just slid the picture in. It was tight enough that I didn't have to tape the picture in. It stays all on its own!
Hope you like it!
Robin
Oh, I used Sticky Strip to attach a piece of cardstock on 3 sides to the square of chipboard so that my frame had a back, and then I just slid the picture in. It was tight enough that I didn't have to tape the picture in. It stays all on its own!
Hope you like it!
Robin
Sunday, April 27, 2008
Bloomin' Beautiful Portfolio of Cards!
This Thursday is my class using this gorgeous set, "Bloomin' Beautiful," from Stampin' Up!'s Occasions Mini. This portfolio box is super adorable! I can say that because I didn't design it. It was designed by a fellow demonstrator, Andrea Walford, who lives in Ontario, CA. She is an amazing artist who just designs the neatest boxes for cards.
The class includes all the supplies to make the portfolio box and 4 lovely cards using the stamp set, as well as a complete set of full-color instructions (about 9-10 pages) that will be ring-bound for ease of use. And all for the low, low price of $20! Isn't that great? To register and pay for the class, click on the link below, and it will take you to the website to register. You must register on that website to be included -- that's where I get my final count.
So what are you waiting for?! (smile)
See ya Thursday!
Robin
Sunday, April 6, 2008
Tart & Tangy Cards & Box
This Thursday night, April 10th, is the Tart & Tangy Cards-in-a-Box class. We will be making these 5 cards (above), 2 cards of each design; as well as this adorable box (below) in which to put them! These will make a cute gift to give away to just to give yourself! They are so bright and sunny, they will remind you that spring is here and summer is on the way! While you are stamping, you will be supplied with yummy Strawberry Smoothies! It's a fruity kind of theme we have going on! LOL.
If I have talked you into coming, go here: http://tartandtangykr.eventbrite.com/ - to register for the event. The deadline to sign up is Tuesday night. I look forward to seeing lots of you there!
Wednesday, January 23, 2008
One of a Kind
If anyone has checked my blog lately, you might have wondered where I disappeared to! It's just been hectic this last 5 or 6 months with my family life and my work life. One daughter got married, then two weeks later my father suffered a life-threatening brain event from which he is still recovering. Praises to God, he is doing great now, just continues to need therapy and still has a few ongoing issues, but overall he is a walking miracle.
Now I feel like I can think about my stamping and my stamping business again, and I'm ready to get to it! I finally sat down and made myself stamp a card with a couple of my new stamp sets from the new Spring & Summer Idea Book & Catalog. I used "One of a Kind" and "Boho Backgrounds," both brand new sets from the new catalog. I used the "dotted" background to stamp across the lower part of the Purely Pomegranate cardstock in Close to Cocoa ink. I used Close to Cocoa Designer Paper across the top portion of the card. Then I stamped the circle stamp from Boho Backgrounds in Purely Pomegranate ink on Whisper White cardstock and punched it out with the scallop punch. Then I stamped the 3-flower stamp from One of a Kind in Purely Pomegranate ink and used the new coordinating punch, Boho Blooms, to punch out the flowers. In the largest flower, I punched a hole and placed an Ice brad, new to the last catalog. Then I just stamped the greeting and used glue dots to adhere the other 2 flowers from the bloom punch. I used the Pomegranate double-stitched ribbon to finish it all off. Hope you enjoy it!
Subscribe to:
Posts (Atom)